Game Panel Documentation
This section is dedicated for explaining how to interact with your Game Server provided by us
- Console Tab
- File Manager
- Text Editor
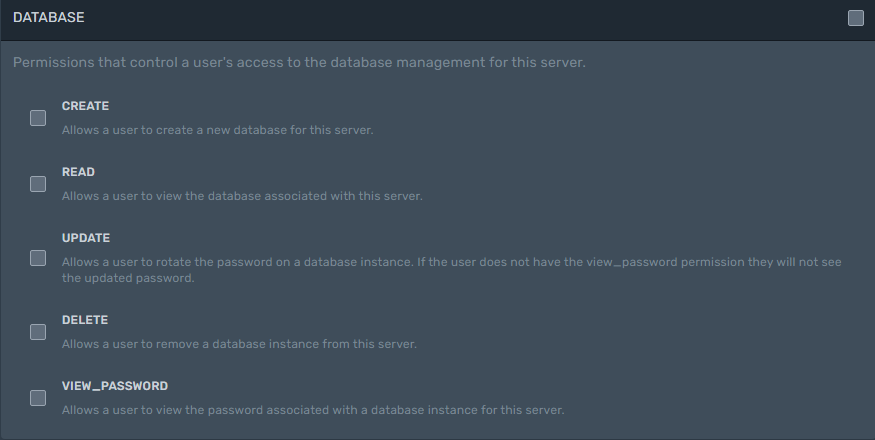
- Databases
- Schedules
- Users
- Backups
- Network Tab
- Startup
- Settings Tab
Console Tab
You can view the terminal output of your server, as well as interact with your server via the console tab,
You can see the name of your server, and its status indicated with a green (online), yellow(starting/stopping), or red(off) dot.
You can see your primary connection address as well as the port on the left of the view of your terminal,
You can see the total amount of ram and disk space allocated to your server on the left on your terminal view as well as how much your server is currently using, You can also see these statistics below your terminal in fancy graphs
You can manually interact with the power actions to Start, Restart, and Stop your server
File Manager
Using the file manager you can interact with your server's files in an intuitive way. Much like you can interact with files and folders on your desktop, You can interact the same way on our file manager
You have the ability to:
- Right click : Opens a context window for more options
- Upload files to your server either with upload window, or you can drag & Drop files into the file manager window (150mb limit)
- Compress files into a tar.gz file for easier downloading & moving of files,
- Decompress tar.gz, and windows .zip files, (not compatible with .RAR)
- Download files from your server onto your local machine
Permissions
You don't usually have to touch permissions, but in the odd case that you do. Here is a good article explaining it
https://danb.me/blog/posts/unix-permissions/
Text Editor
Instead of having to download, edit, and reupload your text files. You can save the hassle by using our text editor on the panel.
The text editor has a couple nifty features such as:
- Auto detect the file type, showing you visual language formatting, (You can manually select the language if autodetect fails)
- Collapsing code blocks to keep clutter down and make reading your files easier
- Color coded text blocks to further help making your text files easier to read
Databases
Databases are useful for sharing information between servers, If you are trying to run a Minecraft network, you will most likely be using them for plugins like, Luckperms, or any plugins you want to share between.
Using the databases is simple, Depending on how many available databases you have to your server, the panel will prompt you to create a new database, All you have to do is type a name, And (advanced) choose which ip's/domains are allowed to connect to it
Once your database has been created. it will bring you to your list of active databases created by you/your server
On this list you will see the:
- database name
- database connection address
- Username.
To view your password, please click the eye icon on the right side of the database list 
Also upon clicking the eye icon, you will see a "JDBC CONNECTION STRING" Most plugins that use a MySQL database will use this connection string, Though make sure you double check if you copy and paste for simplicity
Schedules
The scheduler on our panel is simple to use, but extremely powerful at the same time. Cycle power actions, Or create custom payloads to fit your needs, all can be accomplished with this powerful scheduling system
Creating a schedule
The panel will prompt you to create a schedule by clicking this button ![]()
You will want to choose a name for your schedule that is descriptive to its task
Our scheduler uses Cron Jobs, It can be slightly confusing at first but with this handy little website it will help you greatly in creating tasks you want to schedule on whatever basis you want to have it to be ran. https://crontab.guru Once you have found the interval you would like your task to run, Input it as you see in the website in the "Create new schedule" prompt.
Creating a Task
Now that you have created the Schedule for your server, You need some tasks for it to execute, Here is where we set that up
First off, you need to select the Schedule you would like to create a task for. Once selected it will bring up information about that specific schedule, But you are going to want to create a "NEW TASK" at the top right-ish of the content ![]()
Create Task Window
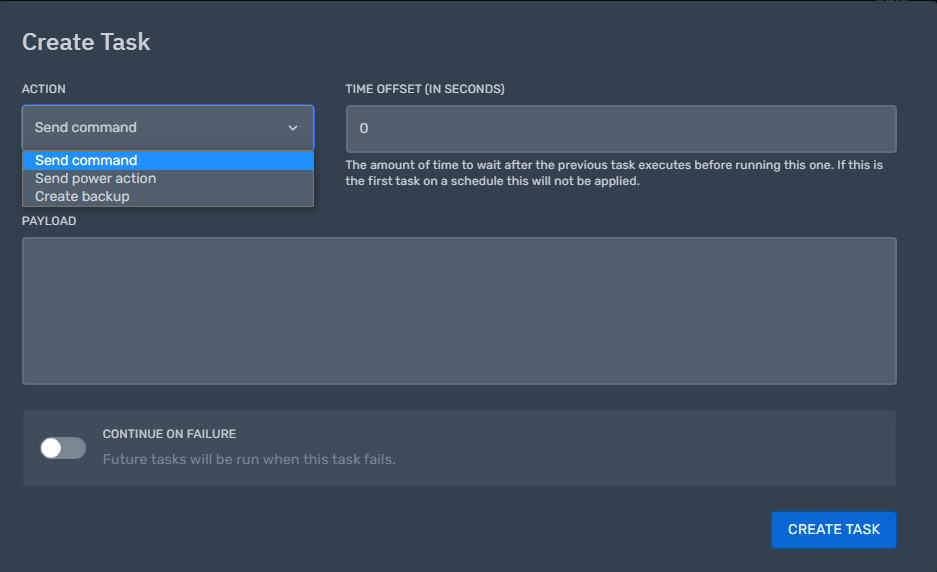
Upon opening the Create Task Window you will be greeted with a hand full of options laid out in front of you. The first of which we are going to be focusing on is the ACTION Dropdown. You will have 3 options to choose from in this dropdown section:
Send Command, Send Power Action, And Create Backup. For the sake of the explanation we will stick to "Send command"
Time Offset (In Seconds) is the amount of time to wait after the previous task executes before running this one. If this is the first task on a schedule this will not be applied.
The Payload is the command we want to send/execute. So for instance lets say we're on a Minecraft server, and we want to automate the server saying You are Awesome!. You are going to want to put "say You are Awesome!" (without the "" ) then hit
"CREATE TASK" You have successfully created your first task. You can add more tasks by repeating the shown steps, but adjust the time offset, (maybe 5-60 seconds inbetween? it depends on what your using it for)
Users
The Users tab is where you can allow other people on to use your panel, (usually reserved to highly trusted people) Not only can you add people to your panel, but you can specifically choose what permissions they should receive as well
User Email
To start things off you want to input the users email into the "USER EMAIL" Text box Make sure it is correct as the panel will send them a conformation email to let them know that they have been added as a sub user to your server
Assigning Permissions
Now that you have entered the user's email, you want to assign permissions to the user so they can have access different files and functions. Be careful when assigning permissions as most of them are dangerous things to hand out randomly
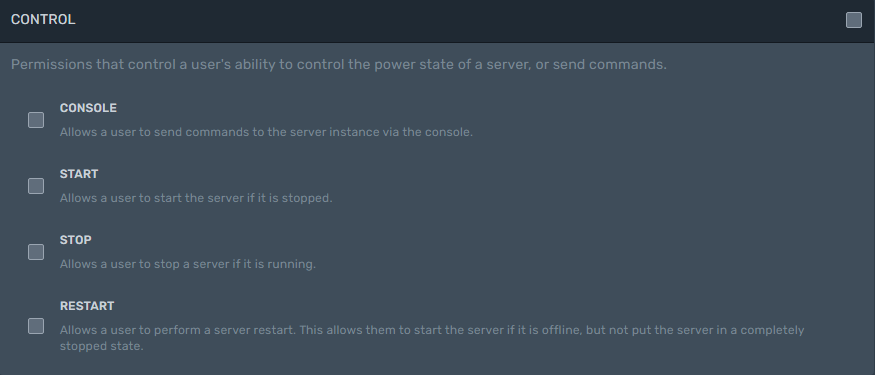
Console & Power action Permissions.
Permissions that allow a user to manage other subusers on a server.
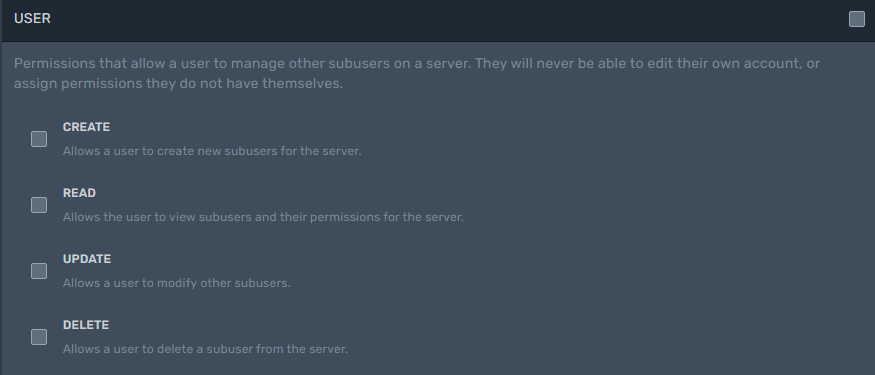
*note: Sub-users will never be able to edit their own account, or assign permissions they do not have themselves.
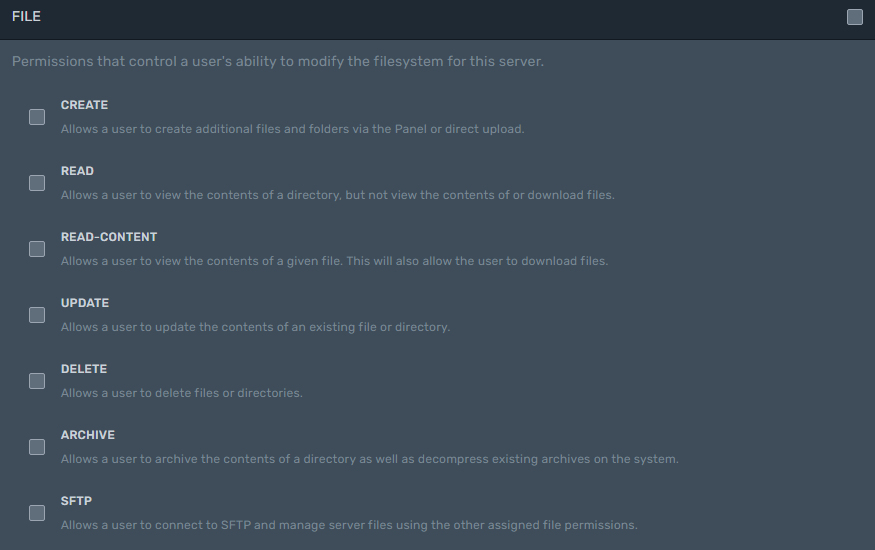
Permissions that control a user's ability to modify the filesystem for your server.
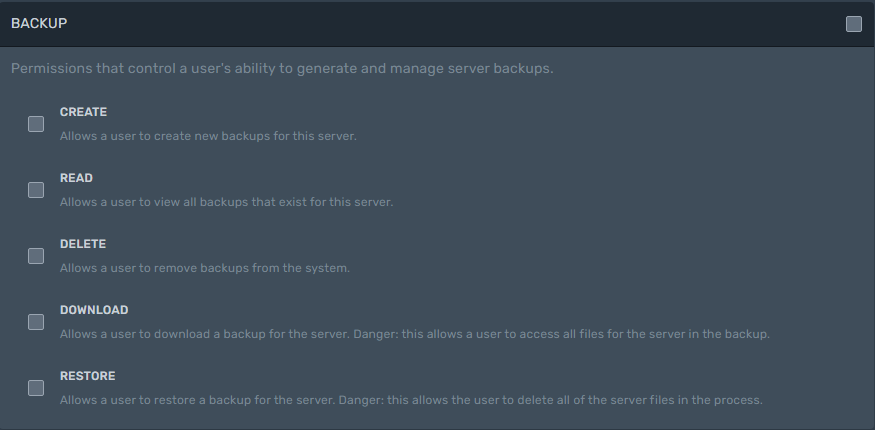
Permissions that control a user's ability to generate and manage server backups.
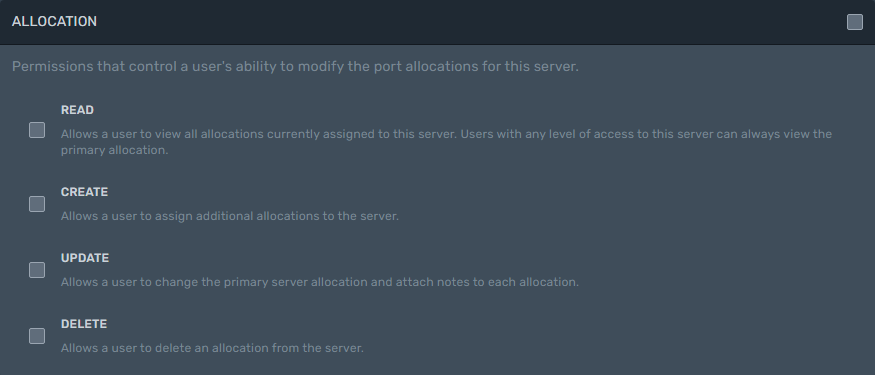
Permissions that control a user's ability to modify the port allocations for your server.
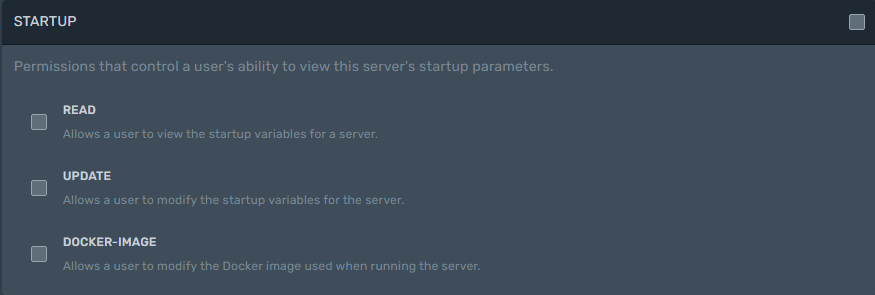
Permissions that control a user's ability to view your server's startup parameters.
Permissions that control a user's access to the database management for your server.
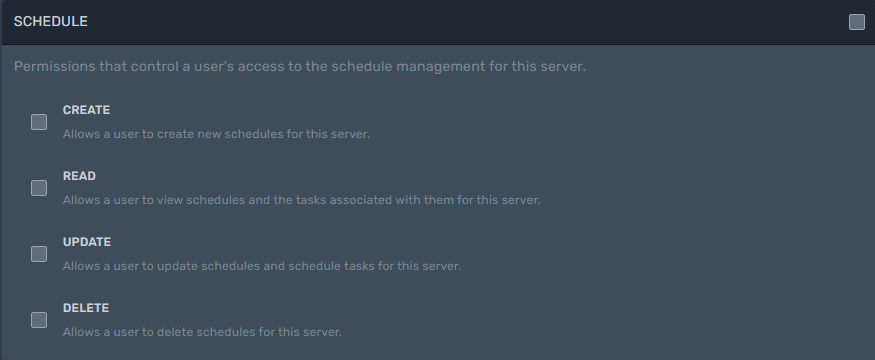
Permissions that control a user's access to the schedule management for your server.
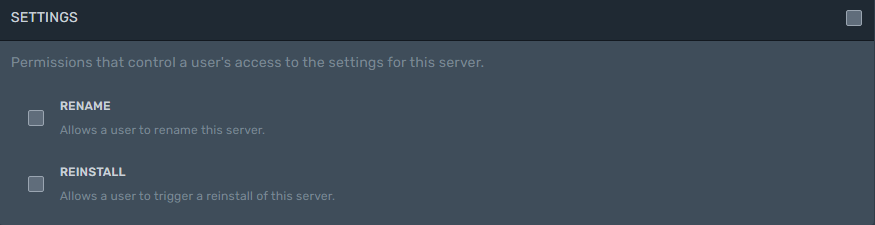
Permissions that control a user's access to the settings for your server.
Backups
The backups tab is where you can see, create, download, delete, and restore from server backups
Creating a backup
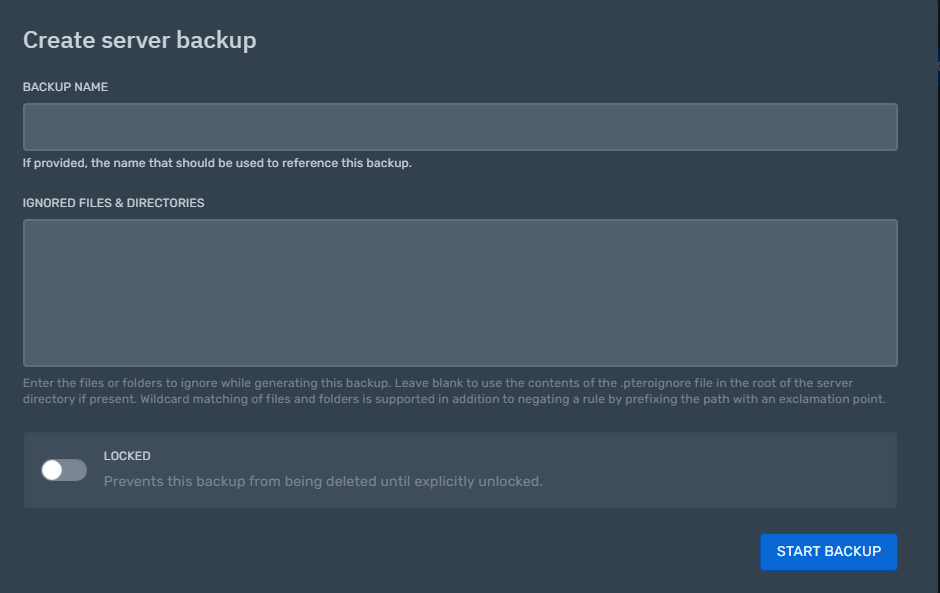
Creating a backup is pretty simple, To start off click the Create Backup Button ![]()
Then you are going to want to choose a backup name (Good practice to include the date in the backup name)
If you would like to ignore any files when creating the backup, Enter the directory path / filename in the 2nd textbox
If you would like to lock the backup (prevent accidental deletion) check the "LOCKED" switch at the bottom of the window
Create Server Backup Window
Backup Options

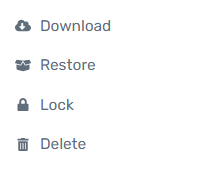
Now that you have a backup, There are multiple things that you will be seeing. The Name & Size of the backup, Below that you will see the sha1 hash, To the right see how long ago the backup was created. To open the context menu click the 3 dots 
Upon clicking the 3 dots a small context menu will pop up with 4 options: Download, Restore, Lock, And Delete
Clicking download will download your backup in a tar.gz file (standard linux version of a .zip)
Clicking Restore will restore the backup to your server instance, (it is advised to create a backup before doing this)
Clicking Lock/Unlock will Lock/Unlock the backup, This is an accidental backup deletion prevention method
Clicking Delete will Delete the backup from your server
Network Tab
The network tab allows you to view the available ports allocated to your server, If you have multiple ports allocated to your server, You will be able to manage which port is primary (connection port)
Ports are at its core are theoretical doorways for programs to communicate over the internet. Ports are usually closed, but can be opened to allow connections to/from 3rd party plugins for Minecraft, RCON for game consoles etc, they all have the ability, if not forced to use ports for communication
*Note* At this time you are unable to assign your own ports, Please request one in a ticket on our support discord server
Startup
The startup tab is where you can change various settings about your server at a more advanced level.
The Startup command is locked, If you would like to make changes to it, please make a ticket on our support discord server
Changing the docker image is moreover needed with minecraft, If you plan on running older/newer servers you will need to run different docker images. each image changes what java version your server will use
Other Variables will change with each game service, so read around
Settings Tab
In the Settings Tab you are able to:
View the SFTP Connection Details (Filezilla, WinSCP, etc)
View Debug Information about your server (When creating a support ticket, it would be helpful to include this information)
Change your server name visible on the panel
Reinstall your server via the service script (This probably will be destructive, Be sure you have a backup as it will restore your server to a fresh install)