Server Basics
These guides are for people who are brand new to hosting their own Minecraft Server
- How to Connect to your server (Java)
- How to Upload your own World
- How to Upload & Remove Plugins
- Pre-Generating your world
- How to create, and manage a Server Backup
How to Connect to your server (Java)
This page will explain how to find your connection address, and connect to your Java Minecraft Server
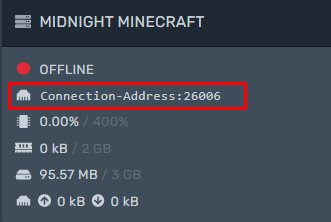
Acquire the Connection Address
Finding your server connection address is easy, Go to the Console Tab of your server and you should see the connection address in
the information window on the left of the terminal window, You can left click your connection address to copy it to your clipboard
Connection Address
Connect to your server
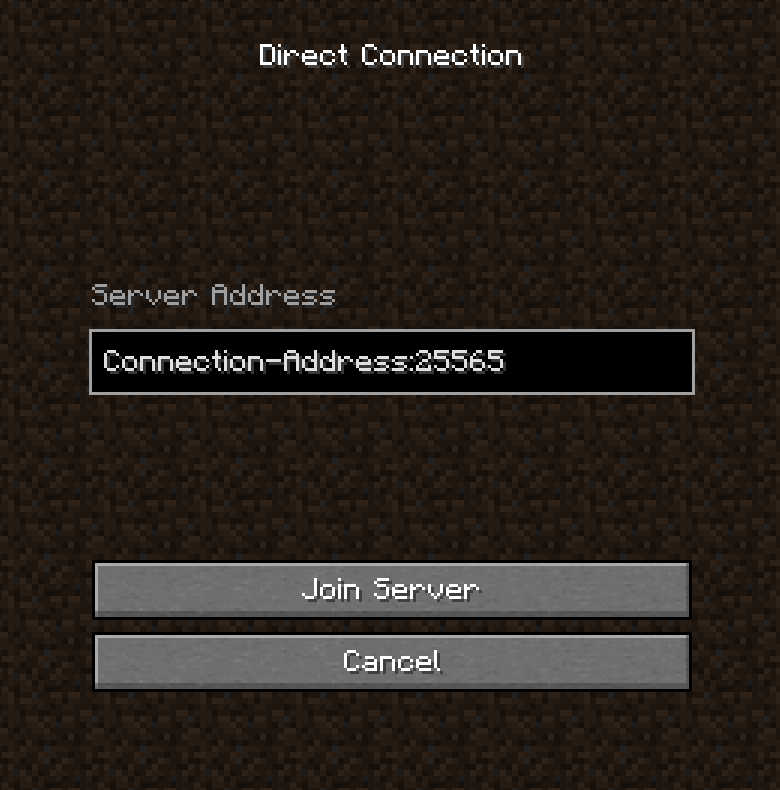
Direct Connection
- To join via direct connection, Copy the connection address mentioned above,
- in Minecraft From the main menu click

- When in the multiplayer menu, Click

- Paste your connection address in the provided text box, and hit Join Server
Direct connection image
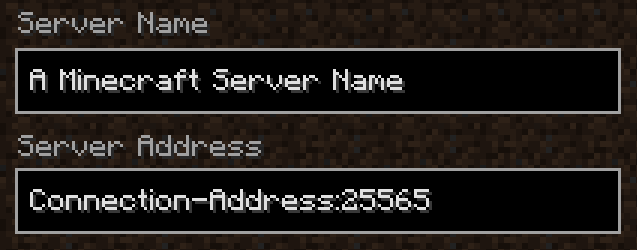
Add to Ingame Server List
- To add your Server into your ingame Server List, Copy the connection address mentioned above
- in Minecraft, from the main menu click
- When in the multiplayer menu click,

- Name the server, and paste your connection address in "Server Address" click Done when you are finished
How to Upload your own World
This page will inform you how to upload your own world, and how to change the configuration to "activate" the world
There are several sources you can find a world file from, be it your game save folder, a public world from Minecraft Forums, or From a previous server you have ran in the past, But first things first you want to get your world file ready
Your server must have been ran once to go through a pre-setup before you upload your world
Locating World Save
to locate your save is a rather simple process, To start off you want to:
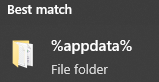
- Hit start (windows key) and type " %appdata% " and click the resulting folder

-
Locate the .Minecraft folder

-
Locate the saves folder

-
Locate and send a copy of your world folder to desktop (the folder name will be name of your world)


Best practice to rename the copy with a - (dash) instead of a space
Compress World folder & Upload to panel
In our previous step we have located our save file and sent it to the desktop
- Create a ZIP folder on your desktop (name can be whatever) and drag your world folder into it
- login to the Game Panel, Locate target server, And open the File Manager
- Drag & Drop your created ZIP folder with your world in it
- right click the uploaded ZIP folder on the File Manager, and click "Decompress"
Changing the world that the server uses
There are a couple steps that require editing the "server.properties" text file.
info on how to use multiverse to have multiple worlds will be in a future page
- In the File Manager locate "server.properties" Click it to enter the text editor
- Locate "level-name=world" Typically on, or around line 10
- change "world" to the name of the decompressed world folder that you have uploaded
- Click the "Save Content" button at the bottom right of the text editor
- Head over to the Console Tab of your server, and start your server again
How to Upload & Remove Plugins
Plugins are a very simple and useful way to customize your server in many aspects. If your looking to browse for plugins to use look though Spigot's Plugin Resources. You can download plugins without an account, but it is very useful to create an account with them.
If you are looking for a specific resource, Use google to search: "(Plugin name) Spigot" to find the resource quicker
Installing Plugins
We're going to be using Luckperms for our demonstration, though Once you have found a plugin you would like to install
-
Download the plugin with the button at the top right of the page:
 (Save/move to desktop for ease of use)
 -
In the File Manager, Navigate to your Plugins Folder, Drag & Drop your downloaded plugin in the window
- Start/Restart your server
Removing Plugins
To remove a plugin you will first need to stop your server in the console tab
To Fully remove a plugin you will need to remove the Plugin.jar, as well as the plugin data folder
You can disable plugins by renaming the plugin with ".jarx" as the file extention
Pre-Generating your world
Pre-generation of your world can massively help with any lag you may be experiencing with your Minecraft Server. In newer versions of Minecraft, Chunk Generation has been severely overhauled, while worlds look fancier, there is much more load on the server when players are wandering around. Generating a small area around your server spawn is a good idea
This guide assumes you have permissions setup and know how to install a plugin, If not please view this page
How to upload a plugin And/or Permissions Quick-Start Guide
Finding a world Pre-generation plugin
There are several plugins out there that will work in generating your world, You can look around on the Spigot Resource Page
We highly recommend the usage of: Chunky, Its an efficient world pre-generation plugin and is what the guide will be based on
Pre-generation settings
You are going to need to define a couple settings for the generator to know how much of the world you would like pre-generated, what shape you would like the world to be generated in (https://github.com/pop4959/Chunky/wiki/Shapes)
chunky shape "shape"
chunky radius "number"
When generating your world, more Disk Space will be used depending on how many blocks/chunks generated
Starting the Pre-Generator
before starting the pre-generator "center" where the generation will take place, And make sure you have set the Radius & Shape
- Find a good spot for your server spawn point
- type:
/chunky center - type:
/chunky start
Your server may be unplayable from the lag caused by this process, It is best to do it when people aren't playing
How to create, and manage a Server Backup
Creating a server backup is a 3 step process, From there you can choose through a list of options to manage your server backups
Creating a backup
- Navigate to the backups tab

- Click the button:

- Name your backup and click:

Managing backups
To manage your backups click "..." on your desired backup

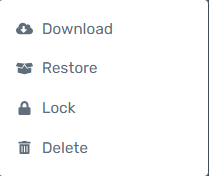
Download: Downloads your selected backup in a tar.gz file
Restore: Restores your backup to your server (Destructive)
Lock/Unlock: Prevents accidental deletion
Delete: Deletes the selected backup